
How to build a serverless website, in AWS
We needed a new website, we didn't need Wordpress. Our experience building our new site, serverless and secure, in AWS.
We have our fresh new logo, stickers, and lots of content. Now we need a new website to begin sharing with our customers and the community. As a company whose mission it is to do "all the things as code," our website obviously can not be some middle-of-the-road Wordpress site. Quite the opposite if you roll with our way of doing things. It must be clean, secure, serverless and fast. Plus, we are going to want a DTAP street so that we can experiment, test and ensure at least one environment which is production-like for testing. Naturally, it must run on the public cloud, in this instance, AWS. Infrastructure code in Terraform, Gitlab for CI/CD with automatic deployments to Dev and manual deployments to Acc and Prod.
For the framework, we decided to use Hugo. Hugo is a popular open-source static site generator. It is straightforward to run locally, so you get immediate feedback on your changes, and it has a built-in mode for building static pages. You can even deploy straight from Hugo to your favourite cloud provider! As we wanted to have a little more control over the deployment, we decided to write custom deployment scripts.
Architecture
As mentioned in the introduction, we wanted to go full serverless. Here is an overview of the architecture:
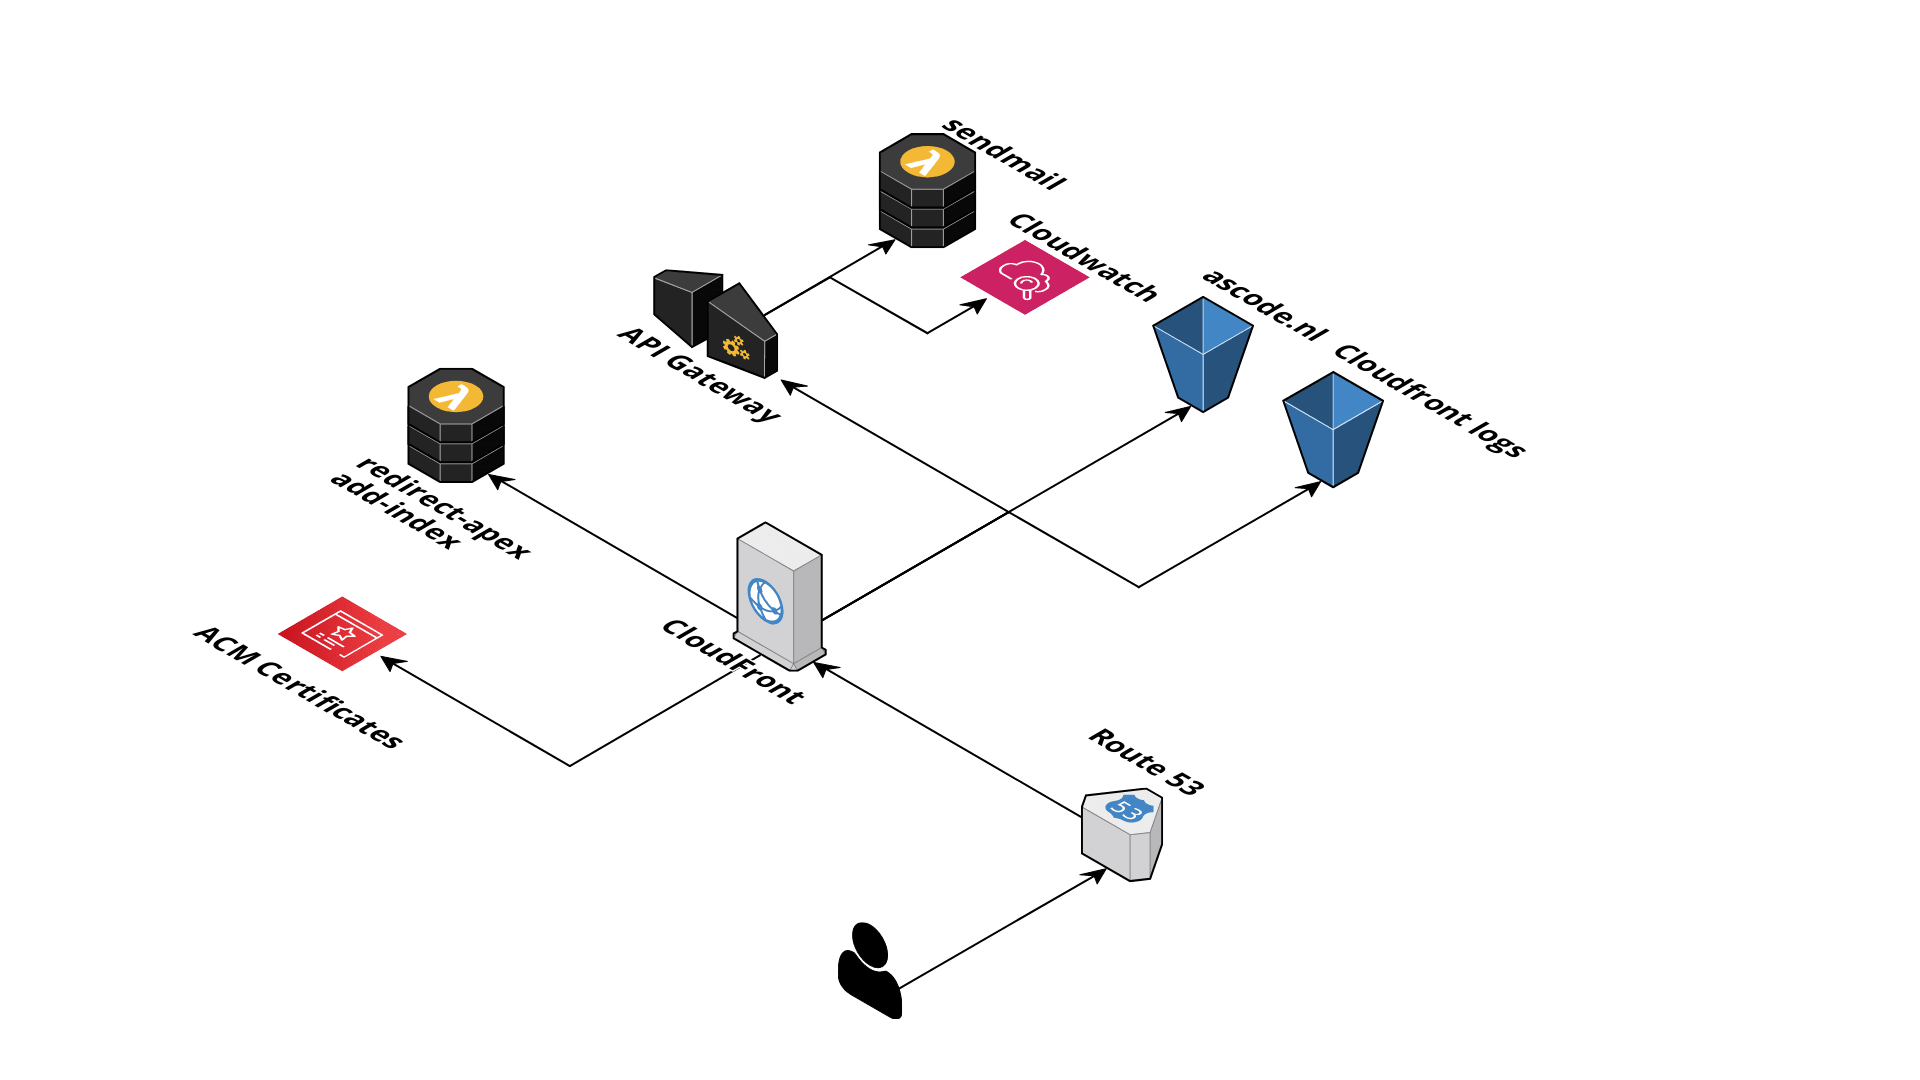
You would think that hosting a static website is easy enough, but there are a few things that need attention. First of all, hosting a website in S3 is relatively easy to set up. But, it does not support SSL and is HTTP-only. That could be perfectly fine for other companies, but not for us - we advocate to implement security in everything we do. The most common way of using SSL with an S3-hosted website is Cloudfront. Since we want this all automated, we leveraged AWS Certificate Manager to generate the SSL certificates that Cloudfront requires. Remember, whenever you want to use ACM Certificates or Lambda function in Cloudfront, they must be created in US-East-1! Also, Origin Access Identity is used to make the S3 buckets only accessible to Cloudfront and nothing else. The S3 bucket cannot be encrypted. CloudFront currently does not support KMS server-side encryption for S3. The reason this does not work is that viewer requests through CloudFront do not have access to the KMS credentials used to encrypt the S3 objects.
Route53 has Alias records for ascode.nl and www.ascode.nl pointing to the Cloudfront distribution.
So far, so good. We started off with an English website, but want to leave the option open to add other languages (hence the "/en" extension when you open our site). With Cloudfront, it is not necessary to configure your S3 bucket (or S3 origin, in Cloudfront lingo) containing the static files in "public-read" mode, which makes it a little more secure. CloudFront does allow you to specify a default root object (index.html), but it only works on the root of the website (such as https://ascode.nl > https://ascode.nl/index.html). It does not work on any subdirectory (such as https://ascode.nl/about/). If you were to attempt to request this URL through CloudFront, CloudFront would do a S3 GetObject API call against a key that does not exist, throwing a "NoSuchKey" error message. Apache, for example, has the DirecoryIndex setting to configure the default document to serve.
With Cloudfront there is no easy way to configure this, at least not if you want to keep your S3 bucket private and use OAI. Enter Lambda@Edge. With this, you can have a function running on the CloudFront edge nodes to request the appropriate object key from the S3 origin. We configured this in a Cloudfront distrbution as a Lambda function association with an origin-request event. We also set the viewer-profile to redirect-to-https so that all requests are made using SSL but still allowing for our website audience to connect over HTTP. Lastly, we want to redirect people coming to our site via www.ascode.nl to be redirected to ascode.nl (also called "naked domain" or "apex"). We use another Lambda@Edge function for this implementation but now configured in Cloudfront as a Lambda function association with a viewer-request event.
The challenges when running a static website - server-side code
Cool, we have our website up and running! Last thing to tackle is our contact form. And boy, was that a challenge! Since S3 doesn't support any server-side code, such as PHP - so you can't use server-side logic to send an email, this required a different solution. Yes, we could have just implemented a mailto: link that will cause the user to open their mail client when they click on it - but what's the fun in that? We wanted a form that allowed anyone to send an email without needing an email client. The function for sending the email is a Lambda function behind an API Gateway. Invoking the protected API requires an API key.
The problem with this setup, however, is that the API Gateway is on a different domain (https://...execute-api...) than Cloudfront (in our case, https://ascode.nl, but could also be https://,,,cloudfront.net). Since the domains are different, the browser will treat this as a cross-origin request. And that means CORS headers are required on the API side. The two most important headers are Access-Control-Allow-Origin and Access-Control-Allow-Credentials. The former is required for every cross-origin request, the latter is only when the {credentials: "include"} option is used. This can be solved in the API Gatway itself by configuring an "OPTIONS" mock request that returns Access-Control-Allow-Origin = "*" to Cloudfront, but this proved to be very error-prone and took a lot of testing.
After some research we found out we can use Cloudfront not only with S3 origins but also with API Gateway origins, eliminating the CORS problem as both the API request as the website request comes from the same domain. There is a trick to this, however. It has to do with the way Cloudfront constructs the URL for the backend. When CloudFront constructs the URL for the backend, you can specify three parts:
- The domain_name
- The origin_path
- The path_pattern at the cache behavior
CloudFront constructs the URL to the origin by replacing the distribution URL with the domain_name+origin_path; then, it appends the path. Because the web site is already on "/", the API needs configuration on a different path. Long story short, the path_pattern you configure in Cloudfront must have the same name as the stage name in the API Gateway. For example, if you have configured a stage called "prod" in API Gateway, the path pattern in Cloudfront will be "/prod/*". It took some time to figure that out. Victory is sweet!
Making this work in DTAP
We write all our infrastructure code in Terraform and Gitlab for CI/CD. For this website, we wanted a "DAP" environment - DEV to check quickly how the site behaves, Acc the same as Prd. Hugo also supports environments (look here), which means we can also parameterize Hugo for the different environments. For example, the API key differs per environment so we can use the respective environment .toml files to configure the various keys.
We have split up the code over multiple repositories; infrastructure code is in a different repository than the actual web site. The same DAP-principles apply, however.
With Gitlab, pipeline as code is relatively easy. It takes some time getting used to the YAML syntax, but once you got the hang of it, it works great. As soon as a branch is ready to be merged into master, a merge request is created. The code is validated and scanned for compliance using terraform-compliance. Once the pipeline is passed, the MR can be merged after which a new version is created, and the code is automatically deployed to Dev. Build/plan is done automatically for Acc and Prd, but they have manual deployment approvals (for now).
If you are interested in what infrastructure code we used, we created a public repository that contains all the code that we wrote to build the AWS environment. As mentioned, in practice, we have this code divided over more than one repository, but for ease of (re)use, we created a single public repo. There probably will be some room for improvement here and there, so if you see a better way to do it, let us know! Or even better, create a merge request against our public repo.